KNIME is based on Eclipse platform and therefore it inherits some of its features too such as the workspace model (workbench) or modularity. Note that you only need to install Eclipse, if you want to extend functionality of OSA plugin. You can implement your own Nodes and contribute them to the OSA Node Repository. The overall process for developing a new KNIME node is outlined below.
1. Install KNIME plugin for eclipse
1.1 After eclipse installation. open it and select your default workspace. All your developed codes will be saved in your workspace directory.
1.2 Install KNIME plugin for eclipse ( make sure that you have already installed KNIME before doing this). To install KNIME plugin follow the steps.
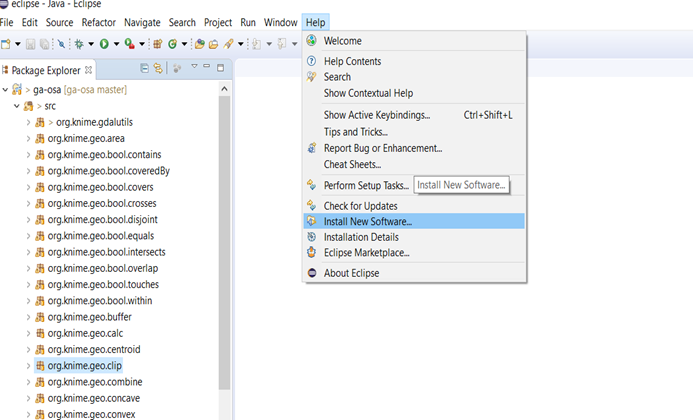
1.3 From Eclipse menu select Window > Install new software.
1.4 In work with box, type the URL: http://update.knime.org/analytics-platform/3.3/. Then click Add.
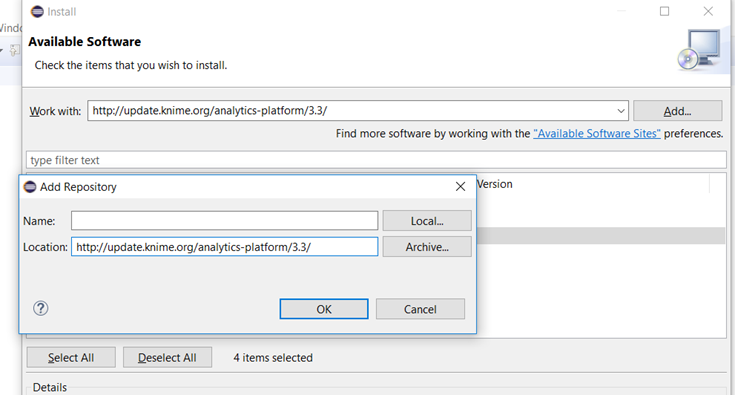
1.5 Click okay in the popup window. Wait for KNIME plugin list to be loaded.
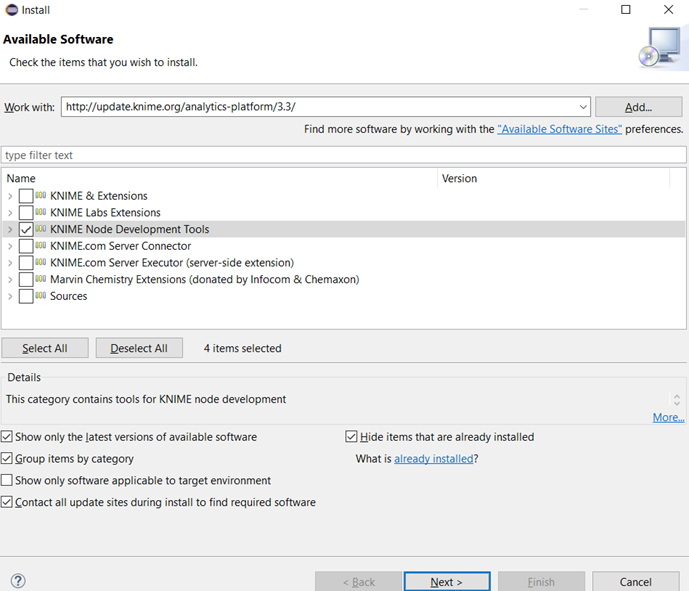
1.6 Once loaded from the extension list select “KNIME Node Development Tools” and click “Next”.
1.7 In next screen click “Next”. Next screen accept the terms and condition and click “Finish”. It will take some time to install KNIME node extensions.
1.8 Once eclipse finishes installation you need to restart it. After this step, development environment is ready to start.
2. Create a new KNIME Node extension project
When Eclipse opens, by default it displays the Java perspective. You may change it for KNIME development by selecting from Eclipse menu, Window>Show view>Other and then look for “KNIME Explorer”.
To start off, you need to create a new KNIME Node extension project. This type of project is simply a Java project with a few extra settings for building and exporting. Follow the instruction here if you want to create your own KNIME node. You will notice a few differences with a Java project such as having:
- a Meta-INF folder that contains a MANIFEST.MF file,
- a build.properties file,
- a plugin.xml file.
3. Develop your custom KNIME node
4. Test your custom KNIME node
For testing your KNIME node from within Eclipse, you first need to set up a Run Configuration. For this purpose, in the Eclipse Run menu, select Run Configurations:
- The Run Configurations dialog opens. Select Eclipse Application and the click the new icon in the toolbar of the dialog.
- Edit the configuration. Under Program to Run, select Run a product. In the list, select the org.knime.product.KNIME_PRODUCT.
- In the Name field at the top, change the configuration name if needed.
- In the Java Runtime Environment field, select Runtime JRE and then if you have successfully installed the KNIME SDK, you may alternately choose the eclipse_knime_3.3.2.
- Save the configuration by clicking Apply.
- Click Run to start KNIME. You may see warnings about category names. These are expected. You should see a new category in the node repository. Open it to see the new KNIME node. Select it to see its documentation in the Node Description view.
Once you set up the KNIME Run configuration, you can use it to test your developed node. More information for testing can be found in here.
5. Packaging
The developed KNIME node cannot be fully tested in Eclipse environment. We need to package the new plugin for deployment and test it within a KNIME installation.
Once development is complete with the node plug-in, the plug-in can be deployed into a .zip file for inclusion in a KNIME instance. To deploy the plug-in from Eclipse, export the project into a deployable format. Here are the steps to create a deployable artifact from Eclipse for the plug-in.
5.1 Right-click in the Package Explorer area and select Export from the context menu.
5.2 An Export dialog appears. Within the selection area, navigate to Plug-in Development. Select the entry Deployable plug-ins and fragments.
5.3 The plug-in deploy dialog appears. The plug-in under development should be listed and selected in the available plug-ins list.
5.4 On the Destination tab, select the option to deploy the plug-in to a directory. Browse to a directory to store the generated plug-in .jar files.
5.5 Click OK to save the generated plug-in.
5.6 Browse to the target folder to find the plugins directory and within it, the generated plug-in .jar.
The plug-in .jar is in a format that can be deployed into a working KNIME instance. To test the plug-in, use a KNIME instance. Copy the generated .jar file for the plug-in into the “dropins” folder of the KNIME instance. Restart KNIME to configure and start the new plug-in. The new node appears in the Node Repository within KNIME and is ready to use within workflows.