Canvas should be your students’ one-stop-shop for all the information they need for their classes. Therefore it is important that your Canvas shell is inviting, informative and easy to navigate. This page will provide you with some helpful tips, resources and information about the 14 Canvas Elements that will help you prepare your Canvas course before the start of semester!
Key Takeaways
Learn about the 14 Elements which Canvas content must be met for each course
Advice and tips for utilising your Canvas course shell for online learning and teaching
Ways to enhance your Canvas course for learning and teaching

On this page:
Canvas QA 14 Elements
What are Canvas QA 14 Elements?
The Canvas QA 14 Elements are a set of core standards guiding Canvas course development to ensure that students enjoy an user-friendly consistent learning experience in Canvas. The Canvas QA checking and publication process has now changed from 2021 onward. The main change being that responsibility has now moved from Studios to the College.
Course Coordinators and Program Managers are now responsible for ensuring that the 14 Elements are met for each course and now can do the publishing themselves.
Why do you need to use the 14 Elements?
It is important to apply the 14 Elements to ensure your course content and design guidelines are consistent, clear, aligned and connected across the University. This means that anyone using Canvas at RMIT will be able to locate and access course content easily, consistently and without frustration.
Discovering the 14 Elements
To discover each of the 14 elements, you can visit this playlist to watch videos which outline each element, description and guidance.
Not sure if your course is meeting the 14 Elements?
That’s ok, download the 14 Elements checklist to quickly check if your course is meeting these University standards.
Other Canvas QA 14 Elements Resources
For a more detailed walkthrough of the 14 Elements, check out this PDF guide.
Your Home Page
The home page is the first thing students will see whenever they open the course. This is a great place to include things such as:
- An introduction to your course – Keep it brief and friendly!
- Details about delivery methods – Let your students know how are you delivering your course. (eg. Online via Collaborate Ultra, face-to-face, concurrent)
- Details about class times – eg ‘Online lectures Monday 1:30-4:30; A link to myTimetable’)
- Up-front messaging about contact methods – eg ‘I will be communicating via Announcements/email/Canvas Inbox’)
- Course links – Links to the Welcome Module, course Syllabus and other useful pages
Remember
This page should be brief and to the point, providing a quick snapshot that will be explored further in the other sections of your course.
Module Structure
The Modules page is where most of your course content should sit. How this looks will depend on the way you deliver your course, however we’ll provide a couple of examples below.
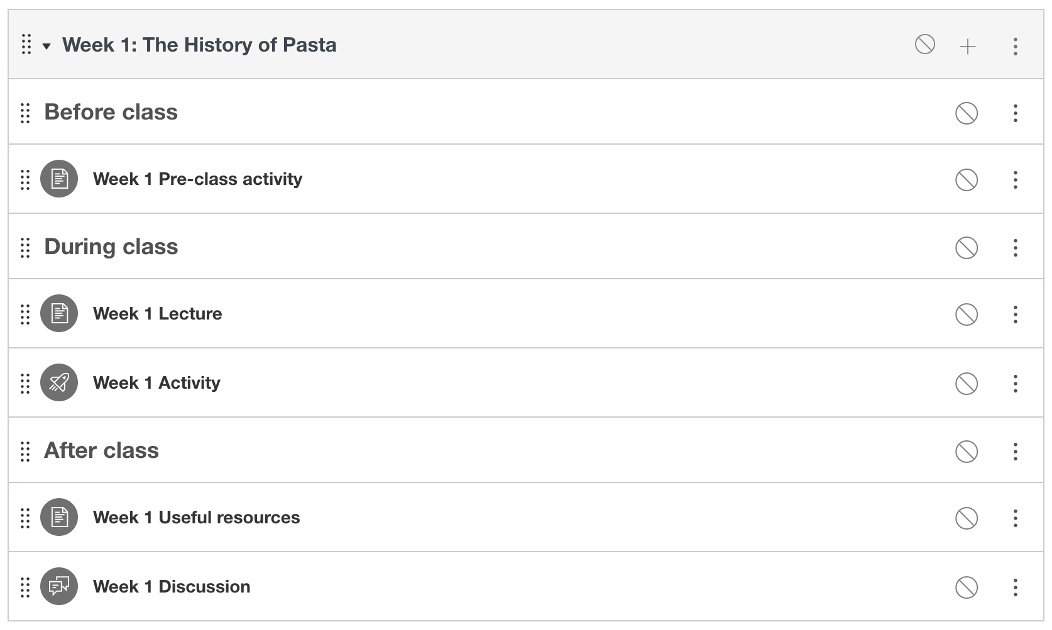
1. The most common way of utilising the modules page is to separate them by weekly content. We recommend creating different pages for lecture recordings and uploads, workshop recordings and uploads, additional readings and resources, and other things such as quizzes and discussions.
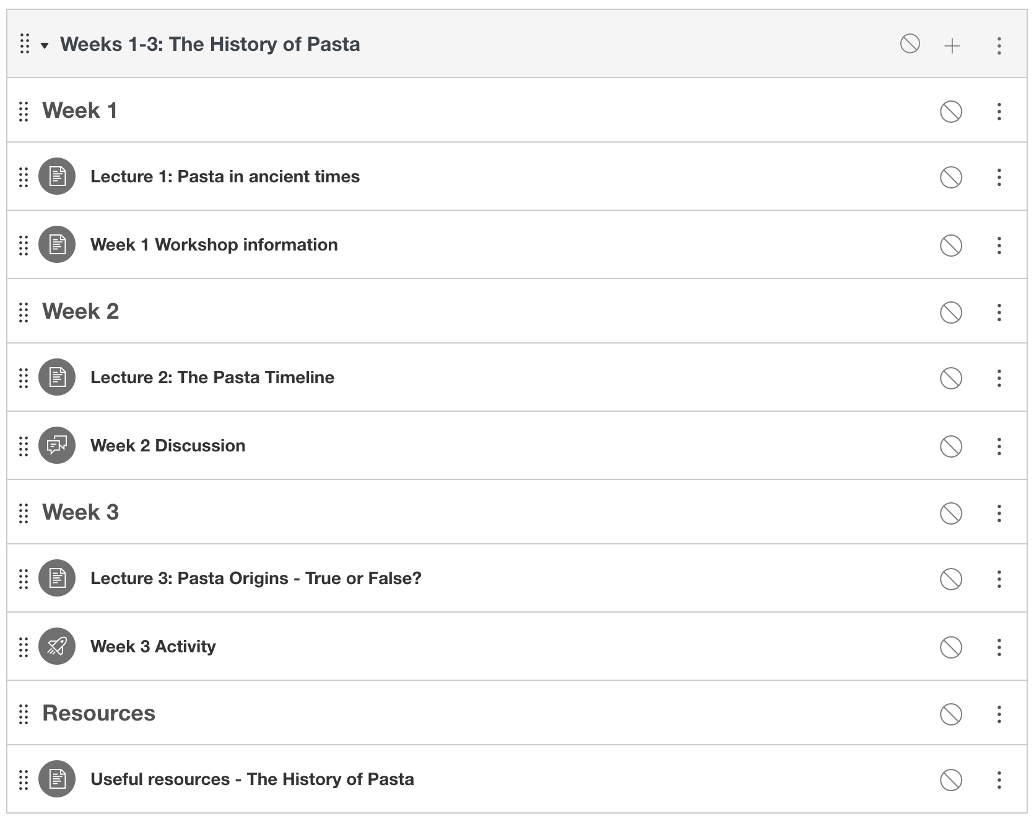
2. Another common way to use the modules that we’ve encountered is to divide them by topic. This means one module could span multiple weeks of content. We recommend the use of text headers and appropriate page naming to divide up these modules.
Remember
Course Syllabus/Schedule
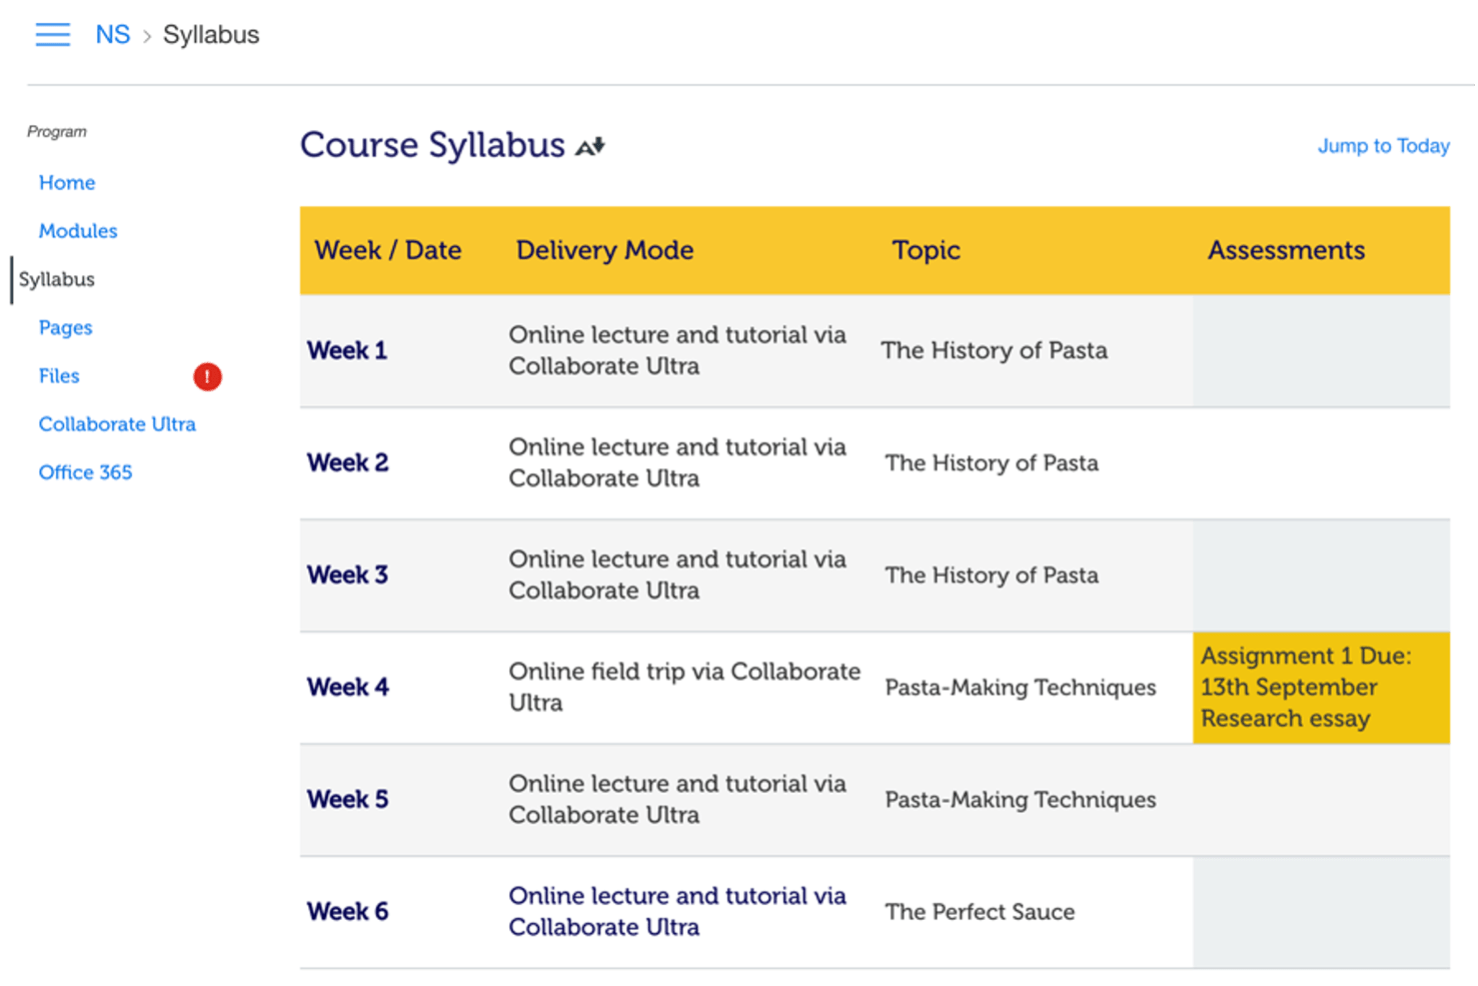
As per the 14 elements guidelines, every course should have a Course Schedule that is provided via the ‘Syllabus’ page in the left-hand course navigation. This ensures students are one click away from viewing their course schedule whenever they are in their Canvas course.
The Syllabus is best set up in a table – the DSC L&T team can help get you started with a template! Think about what you’d like your students to get a snapshot of – this may be weeks, topics, resources, readings, assignment due dates, workshop times, guest speakers.
Linking to the Syllabus
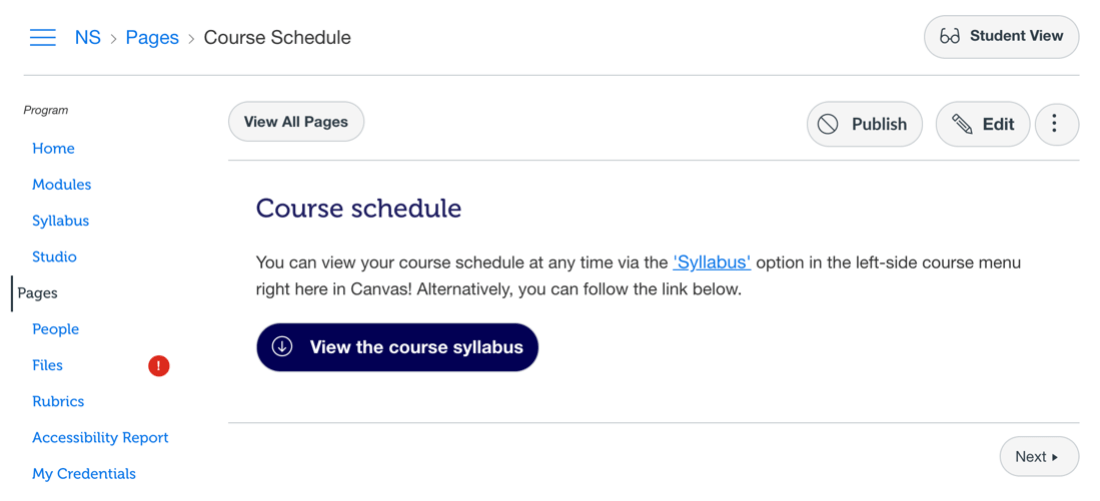
Many teachers like to include their course schedule in the ‘Welcome and Orientation’ module in Canvas. Here’s a simple example page used in the ‘W+O’ module that links directly to the Syllabus page for ease of access for students.
Page structure and instructions
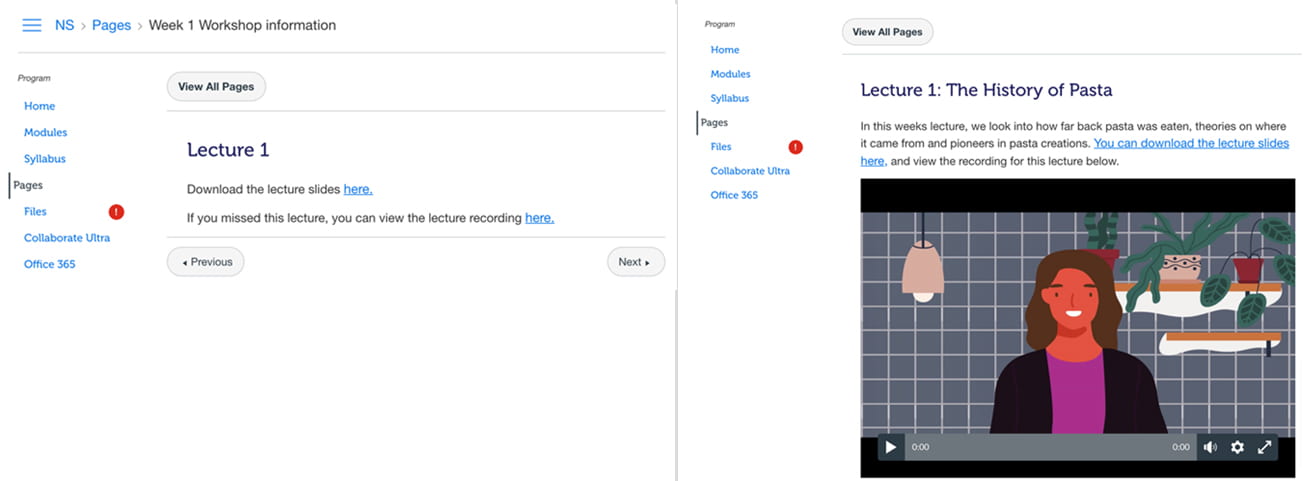
When setting up your Canvas pages, include as much detail, context instruction around the content and activities as you can.
Consider the following Canvas pages:

We can see a big improvement in student experience on the second page, just by:
- Formatting the page a little more clearly
- Naming links appropriately
- Providing a page title and;
- Providing some instructions around the resources
Did you know?
The Library are available for help setting up your Reading Lists in Canvas. Click here to check it out.
Assignments
Assignments are what most students want to know about, so it is important that your assignment pages are clear and easy to read. Follow the list below for tips on what to include in your assignment pages:
- Weighting
- Submission type (eg. Word Document submission via Canvas)
- Word count or length (if applicable)
- Rationale – What is the purpose of this assignment? Why do you require students to complete it?
- Instructions – Step by step. Outline what is expected in the submission, what format, anything they need to know before submitting.
- Learning outcomes – What course learning outcomes does this assignment measure?
- RMIT Assessment policy
- Rubrics
- Any other relevant info – Not all assignments fit these suggestions. What other important information do your students need to know? Explain them clearly, separate different ideas from one another.
Tip:
Some teachers have found that explaining their assignments via video makes it easier for them communicate expectations and gets a better response from students! It can also be helpful to include a Discussion board dedicated solely to a particular assignment so students can go there for help and advice.
For help setting up your assignments in Canvas, including settings, instructions and rubrics, contact the DSC L&T team.
Videos
You can find information on our website about recording and uploading videos, or using Collaborate Ultra and Teams. However, incorporating videos into Canvas, before, during and after class, helps create a sense of consistency and promote the feeling that you as a teacher are present across the course. Here we will cover some tips that can streamline the experience for you and your students.
1. Recording your live sessions
Recording your live sessions is good practice for teaching online. Benefits include providing students with revision material, flexibility in when and how they learn, and being able to catch up on content they may have missed.
Here are some guides on how to record sessions for both Collaborate Ultra and Microsoft Teams.
Tip

2. Interactivity in online lectures and tutorials
Sitting through a 3-hour lecture can be a daunting task – as can presenting one! There are a few ways you can try to incorporate interaction in your online classes including:
- Using native Collaborate Ultra or Teams functions such as breakout groups, polls, status updates, chat and interactive whiteboards.
- Restructuring your PowerPoints to include moments for interactivity. Check out our Interactive Powerpoint Template for inspiration!
- Incorporating the use of external tools for quizzing, brainstorming and much more!
Communication in Canvas
Canvas comes with a number of handy communication tools so students know that one place has all of the information they need.
Announcements
Announcements can be a great communication method to remind students that an assignment is due, that class times have changed for this week, or just to share any fun or interesting information! All announcements act as comment threads, so students can reply to the announcement directly. You can learn more about using Announcements in the Canvas Guides.
Discussions
Discussion threads are a great way to encourage student interaction and generate ideas. We’ve seen some wonderful use of Discussions, including:
- Creating discussion boards for each assignment – Keeping student questions about assignments in one place can reduce the number of emails to you with specific assignment-related questions, as well as empower students to reply to each other and provide assistance with problem areas of their assignments.
- Attaching readings to discussions with prompts/questions – This is a simple way to create an interactive activity, generate conversation among your students and present readings in a more meaningful way.
You can learn more about using Discussions in the Canvas Guides.
Where to next?
If you’re after support for taking your Canvas course to the next level, don’t hesitate to contact the DSC L&T team via our email!